LimeJS is 2D Open Source HTML5-engine for game development with touch-events support and it works (following to the description on the site) with most of mobile platfroms. I have found it not by myself, but last week I’ve got a letter with a proposition to tell community about the engine [in russian, this is an english version] and I’ve decided - so if this is the case, why waste time on trifles, why not to try this engine in action. Among with that, I have agreed in advance with engine authors that I will tell both advantages and disadvantages, so I hope to clear the advertisment halo from the article with that (though, what means advertisment to open-source)..?
Open Source, cross-platform and HTML5 - are the things I like most - they are freedom and innovations :). And more, the engine is written with Closure and it supports chaining - these facts bring an additional bright colors to the engine features and to a programming process with its usage. For sure, a comfort in games development by itself is also required, so we’ll test LimeJS on it together in this article. The engine is presented as working cross-platform. Two example games located on the site home page work good on iPad, a little bit slowly, but quiet playable. And what about my Hero/Android2.1 (HTML5 is not so cool, may be), they are buggy a lot for sure - so literally, it is not very possible to play them. However, almost all of the objects look and act correctly even on smartphone - so we’ll hope that it will work great even on a weak smartphones like mine with further optimizations.
By the way, the engine is positioned as a substitute for Flash-technologies in games. It is a painful theme for a lot of us, in connection with the current anti-flash terror on the one hand and a great games existing and recently created on the other. (And I personally think that the comfort of the very animation creating process mechanics in Flash is still not reconstructed even for HTML5/SVG neither for alternatives). So, may be this engine is having a change to fight out a love from Flash developers and make them love with HTML5. They are and you are who decide. A major difference in LimeJS from ProcessingJS (for example) is a targeting - not to state machine and not to each frame manual control but to the timeline - the event-driven mechanics in the game script.
By the way, here is a code example: javascript and html - to let you make a some preliminary conclusion - I treated the engine a little skeptically at start, but now I think that I certainly was wrong.
How The Result Will Look Like
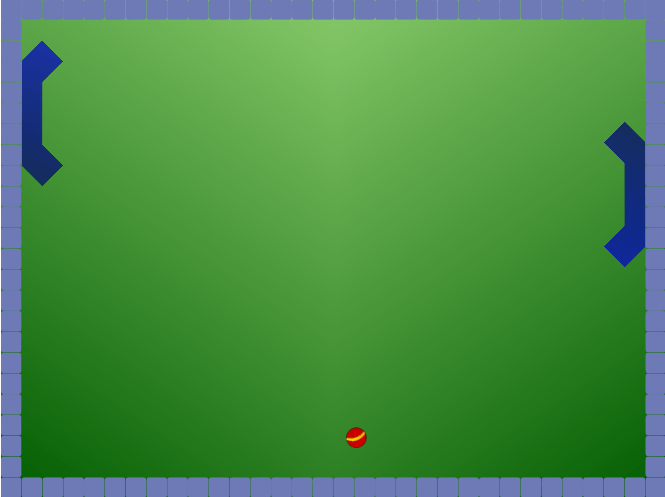
During the article we will develop the very simplified version of ping-pong virtual game with the help of LimeJS. Here is how the result will look like:
There will be videos demonstrating the game we will write running on iPad, iPhone and Android in the end of the article.
Preparation
The engine have a sort of CLI, Command Line Interface. It is written in Python and it gets a required packages using git when installing, so you need to install Python, git and git-svn to work with engine, if you haven’t them already installed. (Seems, developers using Windows will need to do some tricks). Then we get the sources from github or by downloading zip and unpack. This how it can be done on Ubuntu:
$ sudo apt-get install python git-core git-svn
$ wget https://github.com/digitalfruit/limejs/zipball/master -no-check-certificate
$ unzip ./master ./digitalfruit-limejs
$ cd ./digitalfruit-limejs
To install all the other packages required for development (including Closure), we run:
$ ./bin/lime.py init
Let’s Start
$ ./bin/lime.py create pingpong
Yes, let it be the ping-pong, a little bit similar to that shown by Dominic in making a game with Impact HTML5 Engine tutorial. Later I discovered that in demo-sources there is something like that, but let our variant will be much simpler.
There will pingpong.html and pingpong.js files created in pinpong directory. You may open the .html file in the browser, it is pretty interesting by itself - you’ll see a nice circle in the center and you may drag it with mouse or finger. There is also a lot of interesting things in .js-file - you can mention how scene is created and how events handling is managed. The code remains quite understandable and readable. I will not analyze it in details, it is just a stub-example, and you can inspect its “internals” by following the links in the beginning of the article.
The Main Classes and Concept
A brief summary of Programming guide:
Director- is, literally, a director of the game, it holds the scenes, manages transitions between them and keeps the general game settings;Scene- is a separate screen of the game, you can add child objects and layers to it;Layer- is any rectangular part of the screen, it is useful to split screen parts in layers and layers can also be a containers for children objects. Though, the layers can overlap each other, like in Photoshop;ScheduleManager- is a planning tool, it helps to call certain functions either in every frame either after some amount of time will pass;Node- any entity in the game, has its own position, size, scale factor, rotation angle and local coordinate system, so it can be translated (moved), rotated, scaled and animated;Sprite- is the ancestor ofNode, it has all its properties/possibilities and can represent an image and/or geometric shape (startin from circle to any polygon); sprites can be masked from each other, filled with gradients and their collisions can be tested withhitTestmethod;
- Engine is oriented on timeline, not on the things that required to be shown in current frame;
- All the different events related to controllers are handled through Closure mechanisms;
- Animations - translation, rotation, scaling, and fading - can be applied to a single object or to several at once and also can be joined in chains (sequential, simultaneous, looped);
DOM- andCanvas-rendering is supported.WebGL-rendering is planned;- If the animation is applied to DOM-element, it is translated to CSS3-property;
- The out script can be hardly optimized;
- There is an
Audioclass to play sounds;
Building a scene
Let we leave just a several lines from the pingpong.start function given us by developers:
1 2 3 4 5 6 7 8 9 10 11 12 | // entrypoint
pingpong.start = function(){
var director = new lime.Director(document.body),
scene = new lime.Scene();
director.makeMobileWebAppCapable();
// set current scene active
director.replaceScene(scene);
}
|
Don not forget to remove the unneсessary goog.require lines. I will not remind you further about it, you can always take a look at a resulting file header in the end of the article. Let’s add three layers to the scene - floor_ (means background), walls_ and a board that will have all the action happening on it:
1 2 3 4 5 6 7 8 9 10 11 12 | var director = new lime.Director(document.body),
scene = new lime.Scene(),
floor_ = new lime.Layer().setPosition(0,0),
walls_ = new lime.Layer().setPosition(0,0),
board_ = new lime.Layer().setPosition(0,0);
scene.appendChild(floor_);
scene.appendChild(walls_);
scene.appendChild(board_);
. . .
|
Player blank
In a separate player.js file we describe a player class - it will be the polygon in a shape of skateboard (to check how collisions work):
1 2 3 4 5 6 7 8 9 10 | goog.provide('pingpong.Player');
goog.require('lime.Polygon');
pingpong.Player = function() {
goog.base(this);
// ... polygon construction
}
goog.inherits(pingpong.Player, lime.Polygon);
|
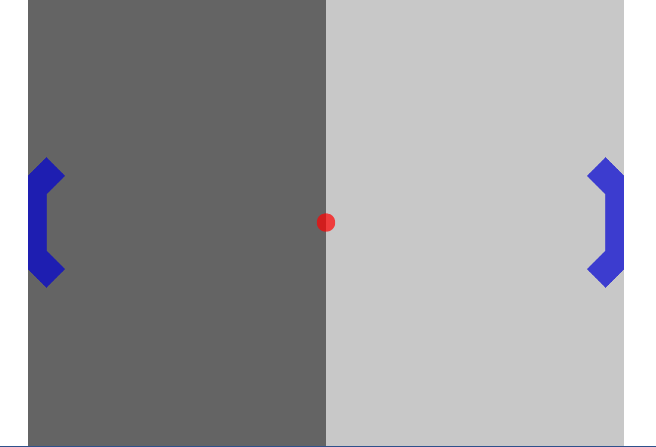
In the place of the comment we will describe a polygon vertices and will fill it with half-transparent blue. Here is how the player will look like (in the tutorial, there are fractional numbers from -1 to 1 are used to describe vertices coordinates (relatively to the polygon center), but in the current version I failed to make them work):
1 2 3 4 | // -1,-2.5, 0,-3.5, 1,-2.5, 1,2.5, 0,3.5, -1,2.5, 0,1.5, 0,-1.5
this.addPoints(-50,-125, 0,-175, 50,-125, 50,125, 0,175, -50,125, 0,75, 0,-75)
.setFill(0,0,210,.7)
.setScale(.4);
|
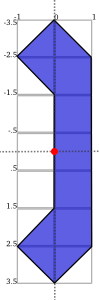
The red dot on a picture is an anchorPoint, it is calculated automatically for polygon. This point is a reference point of local coordinates system of the sprite - all the relative sizes and distances related to polygon are calculated starting from this point.
For the moment, the code is equivalent to the call:
1 | var playerOne = new lime.Polygon().addPoints(...).setFill(...);
|
But later we will add some behavior to the player and it will be obvious that it was a wise decision to create a special class. Let’s check if player is displayed correctly on the scene - let’s return back to pingpong.js file… though, why waste a time, let’s add both players to the board and mirror a first one to make them stand face-to-face:
1 2 3 4 5 6 7 8 9 10 11 12 13 | . . .
goog.require('pingpong.Player');
. . .
board_ = new lime.Layer().setPosition(0,0),
playerOne = new pingpong.Player().setPosition(50,150).setRotation(180),
playerTwo = new pingpong.Player().setPosition(400,150);
board_.appendChild(playerOne);
board_.appendChild(playerTwo);
. . .
|
Before we run it in a browser we need to make one manipulation more - to update dependencies for Closure (it allows you to include just base.js with Closure utilities and pingpong.js in your .html, and all other files are loaded automatically using goog.require). However there is a little bug in the current version of engine - when you create a project, its name is not added to ./bin/projects file. So you need to define pingpong line in your ./bin/projects file before, and after that you can update the dependencies:
$ vim ./bin/projects   # add `pingpong` line
$ ./bin/lime.py update
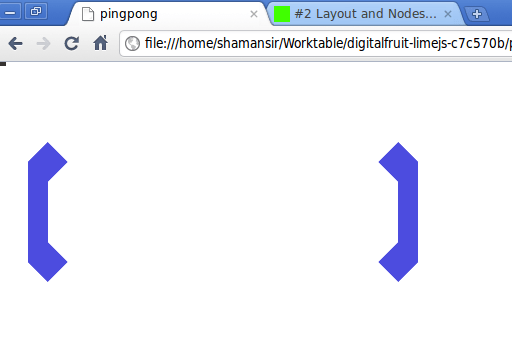
So, this is what you can see on the screen:
Ball blank
Now let’s make a ball.js file with this content:
1 2 3 4 5 6 7 8 9 10 11 | goog.provide('pingpong.Ball');
goog.require('lime.Circle');
pingpong.Ball = function() {
goog.base(this);
this.setFill(255,0,0,.7)
.setSize(20,20);
}
goog.inherits(pingpong.Ball, lime.Circle);
|
Then update dependencies:
$ ./bin/lime.py update
And add the ball to the board in pingpong.js:
1 2 3 4 5 6 7 8 9 10 11 | . . .
goog.require('pingpong.Ball');
. . .
playerOne = new pingpong.Player().setPosition(50,150).setRotation(180),
playerTwo = new pingpong.Player().setPosition(400,150),
ball = new pingpong.Ball().setPosition(275,150);
board_.appendChild(playerOne);
board_.appendChild(playerTwo);
board_.appendChild(ball);
|
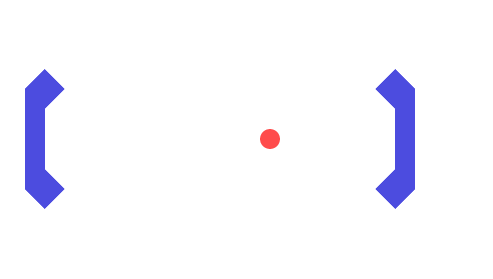
Background
Now let’s create a field with a players, every player will have a half of the field with its own color. We will say Director what are the game screen size parameters:
1 | var director = new lime.Director(document.body,600,480),
|
This dimensions are not related to any pixels, by no means - the game canvas is automatically resized and maximized to the screen when required, but these dimensions allow us to use relative positions of elements on the canvas. Correct the ball position and players positions relatively to new screen size:
1 2 3 | playerOne = new pingpong.Player().setPosition(40,240).setRotation(180),
playerTwo = new pingpong.Player().setPosition(600,240),
ball = new pingpong.Ball().setPosition(320,240);
|
Now, at last, the background. Yep, it will be just two sprites, splitting the screen in half - no indirect logic.
1 2 3 4 5 6 7 8 9 | floor_.appendChild(new lime.Sprite().setPosition(160,240)
.setSize(320,480)
.setFill(100,100,100));
floor_.appendChild(new lime.Sprite().setPosition(480,240)
.setSize(320,480)
.setFill(200,200,200));
board_.appendChild(...);
. . .
|
Wall blank
Wall will not have a lot of logic, but as a tradition we will also place it in a separate class. Walls will have 20x20 size. Create a file wall.js with this content:
1 2 3 4 5 6 7 8 9 10 11 | goog.provide('pingpong.Wall');
goog.require('lime.Sprite');
pingpong.Wall = function() {
goog.base(this);
this.setFill(255,255,0)
.setSize(20,20);
}
goog.inherits(pingpong.Wall, lime.Sprite);
|
Update dependencies:
$ ./bin/lime.py update
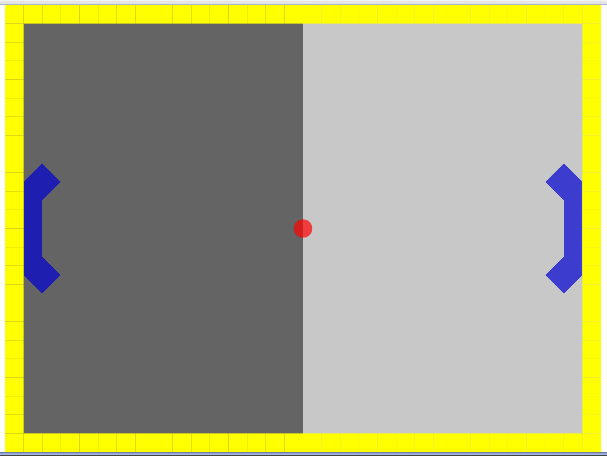
And place the walls along the canvas edges in pingpong.js:
1 2 3 4 5 6 7 8 9 10 11 12 13 14 15 16 17 18 | . . .
goog.require('pingpong.Wall');
. . .
floor_.appendChild(...);
// horizontal walls
for (x = 10; x <= 630; x += 20) {
walls_.appendChild(new pingpong.Wall().setPosition(x, 10));
walls_.appendChild(new pingpong.Wall().setPosition(x, 470));
}
// vertical walls
for (y = 30; y <= 450; y += 20) {
walls_.appendChild(new pingpong.Wall().setPosition(10, y));
walls_.appendChild(new pingpong.Wall().setPosition(630, y));
}
board_.appendChild(...);
|
That’s all, the game board is complete - we can start to program logic!
Players logic
Player sprite must move vertically towards the touched or clicked point, omitting the walls. Moving is done easy:
1 2 3 4 5 6 7 8 9 10 11 12 | . . .
director.makeMobileWebAppCapable();
goog.events.listen(floor_,['mousedown','touchstart'],function(e){
var player_ = (e.position.x <= 320) ? playerOne : playerTwo;
player_.runAction(
new lime.animation.MoveTo(player_.getPosition().x,
e.position.y).setDuration(1));
});
director.replaceScene(scene);
|
But with this behaviour the players are moving through walls. Keep each wall instance to test on collisions with player is not a best way for us, so we will let a programmer to determine what rectangular bounds are restricted for player. Thus we will need two methods in the end of player.js:
1 2 3 4 5 6 7 8 9 10 11 12 13 14 15 16 17 18 19 20 | pingpong.Player.prototype.setMovementBounds = function(top,right,bottom,left) {
this._moveBounds = new goog.math.Box(top,right,bottom,left);
return this;
}
pingpong.Player.prototype.alignBounds = function(x, y) {
if (this._moveBounds === undefined) return new goog.math.Coordinate(x, y);
var size_ = new goog.math.Size(this.getSize().width * this.getScale().x,
this.getSize().height * this.getScale().y);
var newX = x, newY = y;
if (x < (this._moveBounds.left + (size_.width / 2)))
newX = this._moveBounds.left + (size_.width / 2);
if (x > (this._moveBounds.right - (size_.width / 2)))
newX = this._moveBounds.right - (size_.width / 2);
if (y < (this._moveBounds.top + (size_.height / 2)))
newY = this._moveBounds.top + (size_.height / 2);
if (y > (this._moveBounds.bottom - (size_.height / 2)))
newY = this._moveBounds.bottom - (size_.height / 2);
return new goog.math.Coordinate(newX, newY);
}
|
The first one allows to set rectangular boundaries for player’s movement and the second one - returns the position aligned to the edges of this bounds. Note that scale vector is taken into account in calculation process.
Now let’s update the players' definitions in pingpong.js:
1 2 3 4 5 | playerOne = new pingpong.Player().setPosition(40,240)
.setRotation(180)
.setMovementBounds(20,620,460,20),
playerTwo = new pingpong.Player().setPosition(600,240)
.setMovementBounds(20,620,460,20),
|
And let’s correct the event where the movement happens:
1 2 3 4 5 6 7 8 | goog.events.listen(floor_,['mousedown','touchstart'],function(e){
var player_ = (e.position.x <= 320) ? playerOne : playerTwo;
player_.runAction(
new lime.animation.MoveTo(
player_.alignBounds(player_.getPosition().x,
e.screenPosition.y))
.setDuration(1));
});
|
Ball logic
We will also need some additional functions for a ball. The first one, as for player, allows to set ball movement bounds, the second one allows to set ball velocity and the third one allows to set “reset position” - a position where the ball will returned when if one of the players misses it (ball.js):
1 2 3 4 5 6 7 8 9 10 11 12 13 14 15 16 17 18 19 20 21 22 23 24 25 26 27 28 | pingpong.Ball = function() {
goog.base(this);
this.setFill(255,0,0,.7)
.setSize(20,20);
this._xCoef = 1;
this._yCoef = 1;
this._resetPos = new goog.math.Coordinate(0, 0);
this._velocity = 2;
}
goog.inherits(pingpong.Ball,lime.Circle);
pingpong.Ball.prototype.setMovementBounds = function(top,right,bottom,left) {
this._moveBounds = new goog.math.Box(top,right,bottom,left);
return this;
}
pingpong.Ball.prototype.setVelocity = function(velocity) {
if (velocity) this._velocity = velocity;
return this;
}
pingpong.Ball.prototype.setResetPosition = function(x, y) {
this._resetPos = new goog.math.Coordinate(x, y);
return this;
}
|
There we also describe the main detection function, it will test if one of the players catched the ball and will reset ball position if not. If the vertical wall was hit, funtion returns the position of hit to let the outer function to determine which player to blame, judging by theirs position.
1 2 3 4 5 6 7 8 9 10 11 12 13 14 15 16 17 18 19 20 21 22 23 24 25 26 27 | pingpong.Ball.prototype.updateAndCheckHit = function(dt,playerOne,playerTwo) {
var newPos_ = this.getPosition();
var size_ = new goog.math.Size(this.getSize().width * this.getScale().x,
this.getSize().height * this.getScale().y);
newPos_.x += this._xCoef * this._velocity * dt;
newPos_.y += this._yCoef * this._velocity * dt;
var hitVBounds_ = false; // vertical bounds were hit
if (this._moveBounds !== undefined) {
if (newPos_.x <= (this._moveBounds.left + (size_.width / 2)))
{ this._xCoef = 1; hitVBounds_ = true; }
if (newPos_.x >= (this._moveBounds.right - (size_.width / 2)))
{ this._xCoef = -1; hitVBounds_ = true; }
if (newPos_.y <= (this._moveBounds.top + (size_.height / 2)))
this._yCoef = 1;
if (newPos_.y >= (this._moveBounds.bottom - (size_.height / 2)))
this._yCoef = -1;
}
var p1catched_ = playerOne.catched(this.getParent().localToScreen(newPos_));
var p2catched_ = playerTwo.catched(this.getParent().localToScreen(newPos_));
if (hitVBounds_ && !p1catched_ && !p2catched_) {
this.setPosition(this._resetPos.x,this._resetPos.y);
return newPos_;
} else if (p1catched_) { this.xCoef = 1; return null; }
else if (p2catched_) { this.xCoef = -1; return null; }
this.setPosition(newPos_.x, newPos_.y);
return null;
}
|
In such functions you will need to monitor the current coordinate system, you work with, closely and to convert it properly when it is required. In this case
parnet- is the layer that holds the ball and the ball position is the position relative to this layer coordinate system. Thereby we convert the ball position defined in layer coordinate system into the screen coordinate system before passing it to thecatchedmethod, and inside thecatchedmethod described below, we convert the passed ball position defined in screen coordinate system into the player local coordinate system.
Now we need to add the catched method which is used in previous function to player.js file. Using all the polygon vertices coordinates + scale and rotation, it returns if passed position is inside the area of polygon:
1 2 3 4 5 6 7 8 9 10 11 12 13 14 15 16 17 18 19 20 21 22 23 24 25 26 27 28 29 30 31 32 33 | pingpong.Player.prototype.catched = function(pos) {
var p = this.getPoints(),
s = this.getScale(),
r = this.getRotation(),
plen = p.length,
coord = this.screenToLocal(pos),
inPoly = false;
var rsin = Math.sin(r * Math.PI / 180),
rcos = Math.cos(r * Math.PI / 180),
csx = coord.x * s.x,
csy = coord.y * s.y,
crx = (csx * rcos) - (csy * rsin),
cry = (csx * rsin) + (csy * rcos);
crx = coord.x, cry = coord.y;
if (plen > 2) {
var i, j, c = 0;
for (i = 0, j = plen - 1; i < plen; j = i++) {
var pix_ = p[i].x, piy_ = p[i].y,
pjx_ = p[j].x, pjy_ = p[j].y;
if (((piy_ > cry) != (pjy_ > cry)) &&
(crx < (pjx_ - pix_) * (cry - piy_) /
(pjy_ - piy_) + pix_)) {
inPoly = !inPoly;
}
}
}
return inPoly;
}
|
New setting are required to be set when initializing the ball in pingpong.js:
1 2 3 4 | ball = new pingpong.Ball().setPosition(320,240)
.setMovementBounds(20,620,460,20)
.setVelocity(.2)
.setResetPosition(320,240);
|
And now the main thing, checking the events that happened with the ball. We will use schedule method from scheduleManager, it calls the given function in each frame, telling it how much time passed from the previous frame. Currently we will blame the player who missed the ball in console and in the next subchapter we will make a Label for it:
1 2 3 4 5 6 7 8 9 10 | goog.events.listen(. . .);
var hitPos_;
lime.scheduleManager.schedule(function(dt){
if (hitPos_ = ball.updateAndCheckHit(dt, playerOne, playerTwo)) {
console.log('player',(hitPos_.x <= 320) ? 1 : 2,'is a loser');
};
},ball);
director.replaceScene(scene);
|
Blaming Message
Now will add a label which will tell us who failed to catch the ball. Just an information about who failed, we will not waste time on counting the score:
1 2 3 4 5 6 7 | ball = . . .
.setResetPosition(320,240),
label = new lime.Label().setPosition(280,30)
.setText('').setFontFamily('Verdana')
.setFontColor('#c00').setFontSize(18)
.setFontWeight('bold').setSize(150,30);
|
Don’t forget to add the label the to board layer:
1 2 | board_.appendChild(ball);
board_.appendChild(label);
|
And, replace the output target from console to label:
1 2 3 4 5 6 7 8 9 10 11 12 13 | goog.events.listen(. . .);
var hitPos_ = null, defDelay_ = 500, delay_ = defDelay_;
lime.scheduleManager.schedule(function(dt){
delay_ -= dt;
if (delay_ <= 0) label.setText('');
if (hitPos_ = ball.updateAndCheckHit(dt, playerOne, playerTwo)) {
label.setText('player ' + ((hitPos_.x <= 320) ? 1 : 2) + ' is a loser');
delay_ = defDelay_;
};
},ball);
director.replaceScene(scene);
|
That’s all. the ball is flying over the board, bounces from players, the one who missed it is blamed with the evil red label - I think it is enough for demonstration game.
Make-up
Great, let’s do some make-up to demonstrate how gradients and textures work.
Let out background will have a nice grass-greeny color - we will change a background sprites initialization in pingpong.js:
1 2 3 4 5 6 7 8 9 10 11 12 | floor_.appendChild(new lime.Sprite().setPosition(160,240)
.setSize(321,480)
.setFill(new lime.fill.LinearGradient()
.setDirection(0,1,1,0)
.addColorStop(0,0,92,0,1)
.addColorStop(1,134,200,105,1)));
floor_.appendChild(new lime.Sprite().setPosition(480,240)
.setSize(320,480)
.setFill(new lime.fill.LinearGradient()
.setDirection(1,1,0,0)
.addColorStop(0,0,92,0,1)
.addColorStop(1,134,200,105,1)));
|
For players (player.js) we will give a little bit transparent sea-like blue gradient:
1 2 3 4 5 6 | this.addPoints(-50,-125, 0,-175, 50,-125, 50,125, 0,175, -50,125, 0,75, 0,-75)
.setFill(new lime.fill.LinearGradient()
.setDirection(0,1,1,0)
.addColorStop(0,0,0,210,.7)
.addColorStop(1,0,0,105,.7))
.setScale(.4);
|
Ball (ball.js) will have a texture:
1 2 | this.setFill('./ball.png')
.setSize(20,20);
|
Wall (wall.js) will be painted with concrete blue color and inherited from RoundedRect:
1 2 3 4 5 6 7 8 | pingpong.Wall = function() {
goog.base(this);
this.setFill(109,122,181)
.setSize(20,20)
.setRadius(3);
}
goog.inherits(pingpong.Wall, lime.RoundedRect);
|
Now everything looks much prettier:
Compilation
So, the demonstration game is complete. Here are the sources I’ve got:
pingpong.js | player.js | ball.js | wall.js | ball.png | pingpong.html
Now please re-check all goog.require lines - delete the calls that were not used then update the dependencies and collect all the resulting things in one script:
$ ./bin/lime.py update
$ ./bin/lime.py build pingpong -o pingpong/compiled/pp.js
You can copy a pingpong.html file into compiled folder and change the Javascript calls in the header:
1 2 3 4 5 6 7 8 9 10 11 | <!DOCTYPE HTML>
<html>
<head>
<title>pingpong</title>
<script type="text/javascript" src="pp.js"></script>
</head>
<body onload="pingpong.start()"></body>
</html>
|
Resume
I felt skeptical to the engine at first, (just) two games presented at the site are too casual for me. There are not a lot of example and details in documention, and there is a lot of things required for installation. And an acid square as favicon… :)
But then I’ve played in the game with numbers, it appeared to be quiet exciting (its principles are similar to Super 7 HD for iPad - but it is a simple one, event though it a demo). But then, when I’ve trained while writing a game from the article, everything appeared to be convenient, comfortable, considered and even minimalistic. There are minor tweaks and dampness and things not covered in documentation, but if the resulting code is forward-compatible, why not - right now guys are fixing all this stuff. So the final opinion is definitely positive.
The main thing - it is not a state-machine-based engine that is fashionable now - you can build on game script and bind to events, not to time or current frame, you don’t need to think how to optimize drawing a lot of objects in next frame - yes, it almost Flash, it is sad that there is no editor :).
Video
LimeJS Engine demonstation on iPhone - PingPong game from Ulric Wilfred on Vimeo.
LimeJS Engine demonstation on Android - PingPong game from Ulric Wilfred on Vimeo.
LimeJS Engine demonstation on iPad - PingPong game from Ulric Wilfred on Vimeo.
(Videos are recorded with the help of engine authors)
To play
Here you can try to play (it can be a little buggy, because it is a very simplified version, please compare the platform-related experience you get with what you see on video)

P.S. Special thanks to lazio_od, he helped me with testing among with engine authors.